Not really feelin' it this week! Been a little busy, but not so much that I couldn't have torn it up creatively, if I'd felt the urge. The chicken foot is healing nicely though, thanks for asking. Seriously, I had to learn all about bumblefoot quickly, and then go out and buy scalpels, Vetwrap, epsom salts, antibiotic cream, etc..., and do the unthinkable! (Well, for a city girl, it felt that way.)
So, Christmas is coming, people are having parties, I, in fact, had a birthday and Hubbs and I celebrated our 5th anniversary. I also attended an art reception (some distance from home) where I collected prize money for a first place award. So really, the fact that I accomplished anything at ALL is pretty surprising.
The 3-D ruffled stitches now cover the whole triangle grid that I posted last week in its initial stages. And below is what the back looks like:
Next, I feel like it needs a tiny piece of a trunk attached to the bottom of the triangle, and then I'll be tacking the whole thing onto some ecru colored linen and turn it into a triangular shaped pillow. I better get crankin' so I can enjoy it a little while before Christmas.
Then, the market bag isn't very far along either...
It is about 18 inches across the bottom, and those tabs at each side will wrap around D-rings that should cinch up the bag and slightly round the bottom corners. Otherwise, it will basically be a square shaped bag, instead of the standard flouncy rounded shape of most market bags I've seen.
I'm liking the interwoven chains and quadruple stitches. It's necessary to alternate back and forth between the two colors of yarn. I opted for a fairly heavy 100% linen 'yarn', though it doesn't feel much like yarn, really. It is turning out to be much stronger than the crochet cotton I used in my swatch, and should support a watermelon, jug of orange juice, or any other heavy groceries I might buy.
So.... I'll step it up this week and should have a finished Christmas tree pillow to show you next week.
Wednesday, December 12, 2012
Tuesday, December 4, 2012
Has it been a WEEK?
Wow, this past week went fast! I have nothing new finished to show you but I still found ways to be creative last week, despite the sadness and distraction over losing one of our favorite kitties, and despite the trauma over the fact that Walking Dead aired it's last new show until next FEBRUARY, and despite the emotional tension of performing a surgical procedure on a case of infected 'bumblefoot' with one of my roosters... (breathe!) Every couple of days seemed to produce something uncomfortable! But, I eased the pain with crocheting! I have been fiddling with two new projects. One will be a small Christmas throw pillow, and the other is a crocheted market bag. Hopefully the bag will turn out so well that I'll want to make several of them to use at the grocery store.
First of all, let me just say that I seem to be much more interested in the planning/designing of a project than the actual execution of it. That's why I sketch things over and over, create swatches, do and re-do parts, trying to find the most unique and creative way to do it. For instance, I mentioned wanting to make a market bag. I hear they may be about to ban the plastic ones anyway, so I wanna be prepared with my own. Now I'm faced with a lot of choices. This could be a basic rectangular bag, or the slouchy one made with chain stitches that create holes between the loops, that looks more like a hobo bag. Those are fine looking, and that's the direction I started to head. But... my inclination is always to complicate things more and more (read: make aesthetic improvements!), so I was sure I could do better. After having a very respectable start on a 'loopy bag', I tore it all out and went back to the drawing board to create some more scribble.
These doodles were an attempt to figure out something unique... how to combine two different grids, using different colors, and have them 'weave' in and out from each other. I wanted each grid to be separate, not tacked to the other one, but interwoven so it couldn't shift around very far. This entails crocheting each colored rows and alternating back and forth, and making the stitch alternate from front to back of the other one.
I made up this swatch using two different kinds of crochet cotton. I took it apart several times before arriving at this pattern. (I will be using different threads though. I'm eyeing some expensive linen and hemp threads at the yarn store.)
I started on the bottom with a scale that would be fine for some other purpose, but too tight to be a market bag. So, I enlarged the stitches to quadruple crochet and was happy with the spacing on the top section of this swatch. I made one other change in the larger stitch, and now I've decided I don't like it as well. In the image below, can you see how the lower part, the smaller weave, has a diagonal stair-step effect? I didn't do it the same on the larger stitches, so I want to go back to that in the final project.
Okay, so that's all I have to show for myself on this market bag pattern.
But then there's the Christmas tree pillow I've begun as well. It's barely more than a swatch itself!
This technique can be made into many different configurations. I have made hot pads in square shapes, which resemble granny squares, only in 3-D. The concept is to make a grid base for the raised stitches to attach to, and then work three dimensionally to attach the perpendicular stitches in a zig-zag pattern. (Okay, maybe it's not exactly a zig-zag... it's not a Greek key either, but that would be excellent on a long retangular project. It's really just a notched row.) Anyway, my grid here is made with triple crochet stitches, and ch3 sections in between. I drop a square off each end on each row to get the taper. The vertical green stitches are also triples, four to a section. There are no chain spaces between those sections. You just turn the corner and continue the sets of 4 trc. Below is how the back looks:
This 'tree' can be made any size, but the important thing is to have an even number of boxes in your first, largest row (bottom of the tree). Mine has 36 boxes. However many boxes you want, you multiply that number by four, and that will be the number of chain stitches you create for the bottom row. Of course, at the turn, you'll want to also have added a ch7 (4+3) to replace your first triple stitch of the next row and the following three chains. So I did 144+4+3, or 151 chains to start. The box on the very top row needs to be centered over the second row, which consists of two boxes. I learned this the hard way, as I originally started with an odd number of rows so my second-to-the-top row had three boxes and my top row had one. That was all well and good until I started with the raised stitches. They wouldn't flow around the corners from one row to the next! I was always ending a row traveling downward, and I needed to go UP! ARGH!
When you start the raised stitches, it's important to start at the very bottom outside corner and go UP the outer stem. Any other way of starting will result in problems at the other end. The idea is that it flawlessly turns the corner and continues onto the next row, which won't happen if you start in the wrong place or go the wrong direction! Here's a crude example of what I mean:
If you start at the lower right-hand corner as shown, you'll end up turning the corner correctly at the other end:
Just continue working your way up the triangle in the same manner. These aren't so much instructions to make this as it is a guideline which you can easily adapt to your own project if you are adept at crocheting.
When I've finished the green stitches, I'll tack it down to a triangular shaped linen pillow, which I will also make. The fabric I have is an ecru linen, so the color of the grid/base will disappear into it. I'm debating adding some red beads in the tree pleats, or something similar to 'ornaments' here and there, maybe a trunk sticking out from the bottom, etc. Can't wait to see how this evolves.
See ya next week...
First of all, let me just say that I seem to be much more interested in the planning/designing of a project than the actual execution of it. That's why I sketch things over and over, create swatches, do and re-do parts, trying to find the most unique and creative way to do it. For instance, I mentioned wanting to make a market bag. I hear they may be about to ban the plastic ones anyway, so I wanna be prepared with my own. Now I'm faced with a lot of choices. This could be a basic rectangular bag, or the slouchy one made with chain stitches that create holes between the loops, that looks more like a hobo bag. Those are fine looking, and that's the direction I started to head. But... my inclination is always to complicate things more and more (read: make aesthetic improvements!), so I was sure I could do better. After having a very respectable start on a 'loopy bag', I tore it all out and went back to the drawing board to create some more scribble.
These doodles were an attempt to figure out something unique... how to combine two different grids, using different colors, and have them 'weave' in and out from each other. I wanted each grid to be separate, not tacked to the other one, but interwoven so it couldn't shift around very far. This entails crocheting each colored rows and alternating back and forth, and making the stitch alternate from front to back of the other one.
I made up this swatch using two different kinds of crochet cotton. I took it apart several times before arriving at this pattern. (I will be using different threads though. I'm eyeing some expensive linen and hemp threads at the yarn store.)
I started on the bottom with a scale that would be fine for some other purpose, but too tight to be a market bag. So, I enlarged the stitches to quadruple crochet and was happy with the spacing on the top section of this swatch. I made one other change in the larger stitch, and now I've decided I don't like it as well. In the image below, can you see how the lower part, the smaller weave, has a diagonal stair-step effect? I didn't do it the same on the larger stitches, so I want to go back to that in the final project.
Okay, so that's all I have to show for myself on this market bag pattern.
But then there's the Christmas tree pillow I've begun as well. It's barely more than a swatch itself!
This technique can be made into many different configurations. I have made hot pads in square shapes, which resemble granny squares, only in 3-D. The concept is to make a grid base for the raised stitches to attach to, and then work three dimensionally to attach the perpendicular stitches in a zig-zag pattern. (Okay, maybe it's not exactly a zig-zag... it's not a Greek key either, but that would be excellent on a long retangular project. It's really just a notched row.) Anyway, my grid here is made with triple crochet stitches, and ch3 sections in between. I drop a square off each end on each row to get the taper. The vertical green stitches are also triples, four to a section. There are no chain spaces between those sections. You just turn the corner and continue the sets of 4 trc. Below is how the back looks:
This 'tree' can be made any size, but the important thing is to have an even number of boxes in your first, largest row (bottom of the tree). Mine has 36 boxes. However many boxes you want, you multiply that number by four, and that will be the number of chain stitches you create for the bottom row. Of course, at the turn, you'll want to also have added a ch7 (4+3) to replace your first triple stitch of the next row and the following three chains. So I did 144+4+3, or 151 chains to start. The box on the very top row needs to be centered over the second row, which consists of two boxes. I learned this the hard way, as I originally started with an odd number of rows so my second-to-the-top row had three boxes and my top row had one. That was all well and good until I started with the raised stitches. They wouldn't flow around the corners from one row to the next! I was always ending a row traveling downward, and I needed to go UP! ARGH!
When you start the raised stitches, it's important to start at the very bottom outside corner and go UP the outer stem. Any other way of starting will result in problems at the other end. The idea is that it flawlessly turns the corner and continues onto the next row, which won't happen if you start in the wrong place or go the wrong direction! Here's a crude example of what I mean:
If you start at the lower right-hand corner as shown, you'll end up turning the corner correctly at the other end:
Just continue working your way up the triangle in the same manner. These aren't so much instructions to make this as it is a guideline which you can easily adapt to your own project if you are adept at crocheting.
When I've finished the green stitches, I'll tack it down to a triangular shaped linen pillow, which I will also make. The fabric I have is an ecru linen, so the color of the grid/base will disappear into it. I'm debating adding some red beads in the tree pleats, or something similar to 'ornaments' here and there, maybe a trunk sticking out from the bottom, etc. Can't wait to see how this evolves.
See ya next week...
Tuesday, November 27, 2012
Has it really been a YEAR?
I blame the illness! ...the MCD! I may be going in a lot of different directions simultaneously, making this piece of art, or that jewelry item, pet collar, recycled shopping bag, decorated cookie, construction project (like a greenhouse, no less!), garden bed.... etc., but apparently blogging about those bursts of creativity isn't one of my symptoms! I have no excuses, but I'm in denial about there being any treatment for such procrastination. Let's move on then, shall we?
I just learned a new term today. It's the acronym 'NaBloPoMo' which stands for National Blog Posting Month. The idea was developed some time ago, stating that somehow it was a good idea to challenge yourself and post a blog each and every day for the period of a whole month, namely November (though it could be any given month, at the blogger's discretion). What kind of insanity is that? I dismissed it as being some kind of ridiculousness that only people with NO LIVES would take on. Then the more I got to thinking about it, I decided I should take a similar challenge, but attempt to enter a blog post at least once a week, rather than daily. To me, that's challenging enough! (To be honest, if I went back over the course of the past year and wrote about all the creative things I'd been working on, I could probably fill a month with daily entries! But HEY, let's not get carried away. Once a week is plenty.)
So how about some news of the most recent project? Here's the story of that greenhouse!
One day this past fall, when my parents were visiting, we got the wild idea to build a small shed to store my garden tools in. I was only half serious about it, but on a whim, I asked my neighbors if they had any bits and pieces of lumber left over from a project they recently finished of adding on a screened room to the back of their house. They did, in fact, have a nice haul of things they didn't want anymore. There was a platform of 2x8s (or maybe they were 2x10s) that supported their old hot tub and two sets of 'grids' that were part of an old deck, made of 2x6s. There were also a set of wooden stairs and a bunch of short pieces of treated 2x6s as well. So they were nice enough to deliver all the pieces over to our yard, and in short order, we had started a foundation to my garden shed.
That's the foundation in the back, and some of the free lumber in front. I am building on a slight slope, so the right side is made from the larger 'hot tub foundation' and the left side was pieced together with the shallower lumber. It was at this point that I got the bright idea to made one side a greenhouse, while the other side remained the original tool shed idea. The project grew to be a bit more complicated than originally intended, but that's what I do! Always complicating things more and more, so each change results in being more creative than the previous draft, IMHO. Our free wood was soon used up, and the budget for the rest of the project also grew. Thank God for parents who give you building materials as a Christmas gift!
Soon I had the plywood floor in place, and one wall configuration built. That's it, laying out on the floor, below.
Then the large window openings got divided into thirds, and the roof needed extra lumber to create a series of lips that the corrugated panels could attach to.
The greenhouse half of the shed has a clear roof, and the other side got a roof made of plywood, covered in shingles that match my other cute shed, that I built a couple of years ago.
The rest of the walls were enclosed in siding.
The top of the solid roof extends slightly over the ridge, covering the top of the corrugated panels.
...then comes the window coverings...
...and trims galore...
...and a colored door!
A few special aesthetic touches were added...
I got the outside finished just in time to fill the shed with plants before the weather got colder, and even though the inside isn't quite done, the plants are happy to be there!
On cold nights, I can turn on a small heater or a light. It's magical when the light is on!
And did I mention it has a loft?
This is me, sitting on the loft platform, pondering my next project. I'll see y'all in about a week!
Wednesday, December 28, 2011
Lucky Chickens
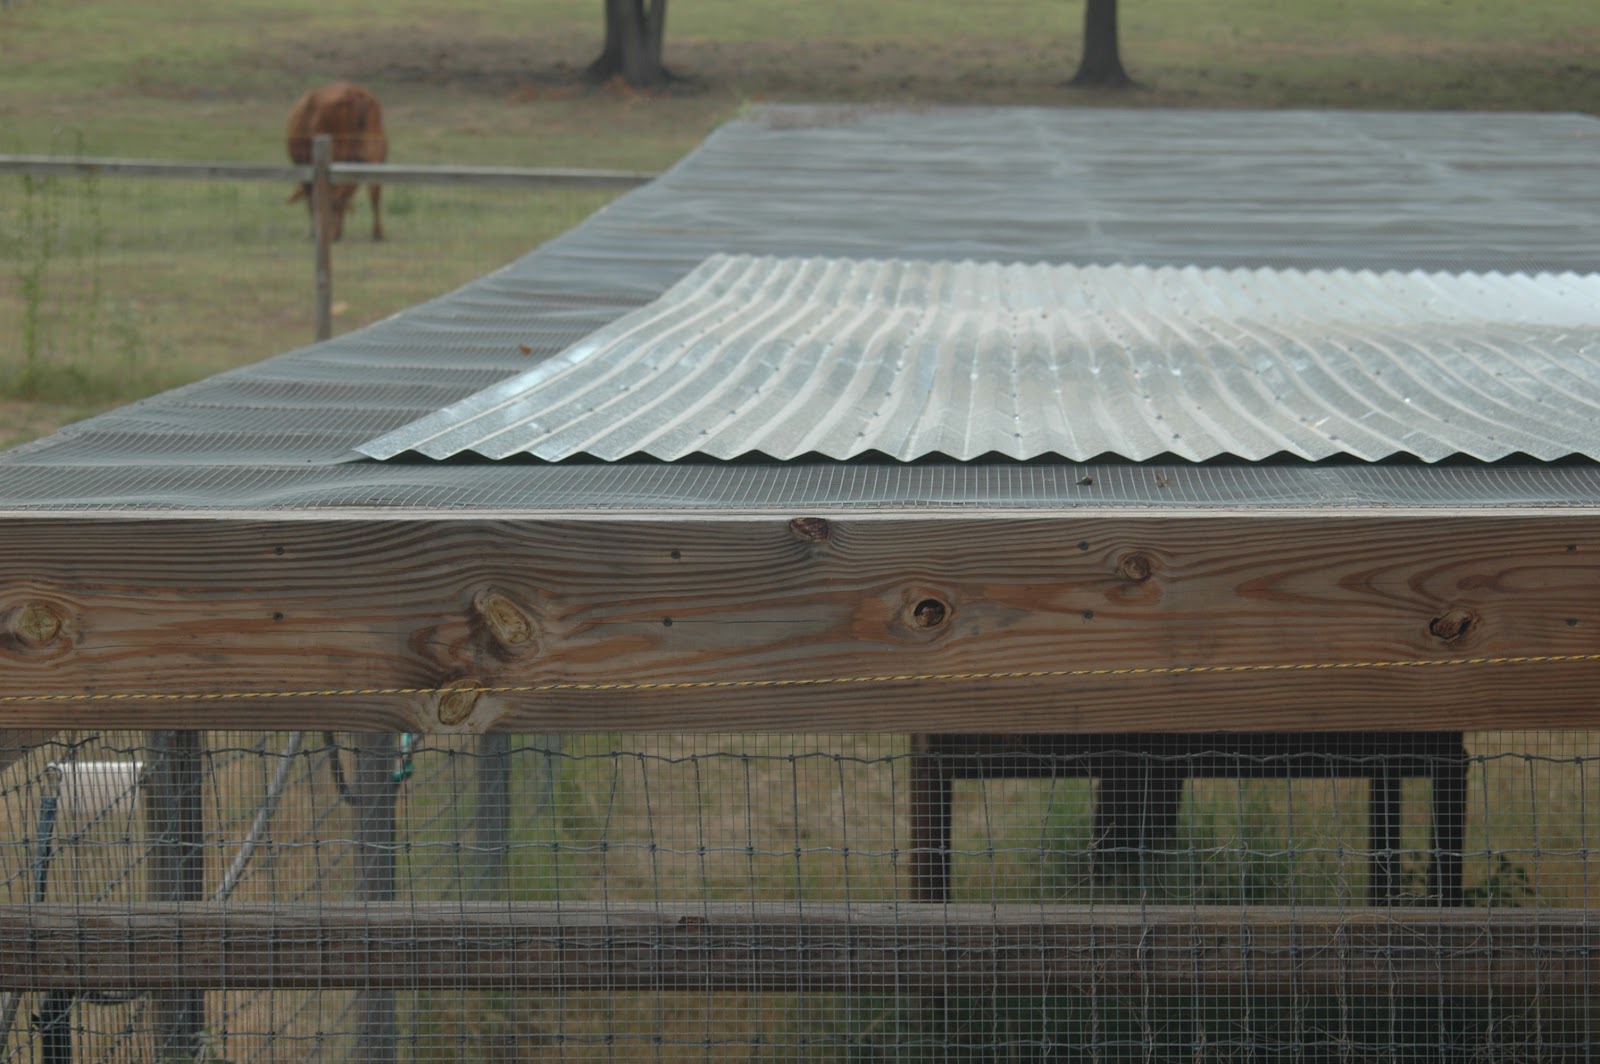
We have quite a large pen for our chickens to run around in. It's the next best thing to being able to free-range, but they are better protected from the hawks, owls, coyotes, our herd of cats, and our neighbor's 2 Great Pyrenees dogs. The basic structure measures 16' wide and about 75 feet long, with a height of about 6', so I can just barely walk upright without bumping my head. At the moment, we have 13 chickens, so there is plenty of room for expansion of the flock. The perimeter started out with horse fencing completely enclosing it, and the roof is covered with 1/2" hardware cloth. But I realized I needed to make some modifications.
First, I added some corrugated panels on the roof so the chickens have some shade from the harsh Texas sun. This picture shows it unfinished though. It is deceiving, but the panels go one third of the way down the length of the run, and it has since been covered the rest of the way to the left side and along the near edge.
Here is the roof from the inside. I didn't bother to take off the hardware cloth. I started to, and after spending 20 minutes on one small section, I decided those staples were going to stay in place!
The size of the horse fencing around the perimeter proved to be too large for the best security, so I started covering it with more hardware cloth. Sheesh, that ran into some money! But since we do have a snake problem, it seemed necessary.
It was also important to fortify the bottom of the fencing better by going down into the ground
about 10 inches and burying the bottom piece of hardware cloth in an 'L' shape, to deter any
digging predators there might be.
Now for the accommodations. I decided not to build a completely enclosed coop, but rather just to shield a corner from the elements by tacking up some cedar fence boards.
Then I built three levels, connected by a circular stairway.
Even as it is, I'm pleased with the shelter it provides, but ultimately I plan to close in the two short sides, build some cubicles on a couple of the levels, and then install some cute cosmetic touches. The weather has turned rainy and colder, and combined with the holidays, this project is on the back burner. But the chickens seem to like it just as it is.
Wednesday, September 14, 2011
The important things
A week ago Sunday, I was jarred out of my interior design trance ('oooh, I want one of THESE in my newly remodeled kitchen', and 'I hate this house, I hate this house') by a frantic knock on the door and a man yelling 'Everybody get out!!!! You gotta leave now, mandatory evacuation order RIGHT NOW!!! Drive out Cardinal and turn left on 21 as fast as you can, NOW, NOW, NOW!!!'
Well, heck, I was just settling in with some hand drawn house plans, a great cup of French Press coffee, and some fresh fruit... and now I have to hustle? That's not what Sunday mornings are all about!
So when I looked out our front window, this is the view I saw:
These Chinooks were scooping water from my father-in-law's pond to dump on our neighbor's home. Then they left and Blackhawks took their place and continued scooping and dumping. It was very noisy and exciting on our street!
And more animal news... many of the chickens/guineas/swans, etc. that we turned loose have stayed around their home, and with much effort, we stopped the fires from finishing off the place. I have gone there twice daily to refill food and water. We managed to catch quite a few chicken and relocate them to our large pen until the owners can come back to their house. We will help them catch the rest of the birds as best we can and get them in their repective pens.
I keep having to chase their guinea hens home. They are quite comical!
We have adopted this little sweet kitten who's owner has not come home for days and his house is all burned up. He and his brother are safe and sound at our house. We have named them Ashley and Agent Smolder.
Well, heck, I was just settling in with some hand drawn house plans, a great cup of French Press coffee, and some fresh fruit... and now I have to hustle? That's not what Sunday mornings are all about!
So when I looked out our front window, this is the view I saw:
We decided to ignore the evac order and stay as long as possible, knowing our way out (through a neighbor's pasture) would come in handy since we were at the very back of a long dead end road. We packed our cars full of pet carriers and belonging and carted them to the parents' house on the other side of the property. The sky turned to this:
And then this:
We got the majority of our favorite things transferred, and begun to hose down our property, the roof of our house and shed, and filled 55 gallon barrels with water to tip over at the last minute if necessary. The strong winds were in our favor, blowing the fire to the west of us all through the day, night, and the following day. This was the view of my father-in-law's windmill during the first night of the fire:
I have no photographs from Day 2. At some point, I just had to put down the camera and get to work. We were fighting off the fire around the perimeter of our property. My father-in-law filled a tank of water on his tractor and he and my husband went around spraying fires in the back woods. By early evening, the fire had encircled our neighbor's property directly behind us. They breed and raise chickens and birds of all kinds. We knew they had evacuated, so we felt we had to open all the cages so the birds didn't all fry in their pens. As we did so, the fire had engulfed a couple of their sheds and was closing off the lane at the curve. This was our way out, so we had to hustle. My husband and his father worked through the night with the tractor and water tank. By noon the next day, most of the fires they could see were under control, but they weren't aware of another nasty fire creeping closer to our other neighbor's house. All of a sudden, it started exploding repeatedly. Some other neighbors had just snuck back home via the secret back entrance, so they came running. All of us were out there with garden hoses, which felt like little squirt guns aimed at such a big fire. Right then, when it looked like this had gotten bigger than we could manage, the cavalry arrived. Several fire trucks came down our culdesac. Even THEY had to call in more help. The next thing we knew, these angels from Heaven were coming to our aid:
These Chinooks were scooping water from my father-in-law's pond to dump on our neighbor's home. Then they left and Blackhawks took their place and continued scooping and dumping. It was very noisy and exciting on our street!
FINALLY, the worst of the fires were over in our area. Latest word (as of 9-13) is that the fire is only 60% contained as a whole. But since we were at the 'beginning' end of it, the areas still burning are more downwind of us.
Our neighbors had set up a temporary animal rescue operation, since their daughter-in-law was a vet. She was able to take in hurt, displaced, or scared animals and stabilize them, soothe them, feed them, whatever was necessary, while matching them up with their owners. I believe it was also coordinated and approved by FEMA, so they had ways to monitor where animals were, who they were to be turned over to, etc. One particularly sad pony came through who's owner had obviously neglected him and failed to keep his hooves trimmed. This sweet little guy hobbled along much slower than the other ponies they found in his same group.
The yellowed hair on his back is where he got singed.
And more animal news... many of the chickens/guineas/swans, etc. that we turned loose have stayed around their home, and with much effort, we stopped the fires from finishing off the place. I have gone there twice daily to refill food and water. We managed to catch quite a few chicken and relocate them to our large pen until the owners can come back to their house. We will help them catch the rest of the birds as best we can and get them in their repective pens.
I keep having to chase their guinea hens home. They are quite comical!
A stray horse was found:
I took a drive through our neighborhood. Where there used to be hundreds of homes up and down our street to the west, now there are maybe 6! Our little cluster of neighbors fared well, for the most part. That's may be due to the fact that we stayed and fought the fire and didn't let the back-burning creep too far in our direction. Well, two of our immediate neighbors lost homes, unfortunately. We had no idea when our new neighbor Robert's place burned down. We were likely working on the other side of the farm when that happened. He had just moved in and we really hadn't gotten to know him yet, but now, through this ordeal, we are very glad he will rebuild and join our community. We also learned what most of our other neighbors are made of. We love our little neighborhood family! Now, here are some sad pictures of the homes on down the street, of neighbors we didn't know.
And this is (WAS) our neighbor's house:
Now the bulldozing and cleanup begins:
We have adopted this little sweet kitten who's owner has not come home for days and his house is all burned up. He and his brother are safe and sound at our house. We have named them Ashley and Agent Smolder.
You can barely see the kitten hiding in the lower part of the picture. This next picture is what is left of his owner's yard and workshop:
Now that this disastrous ordeal is mostly over for us, I am so much more thankful for the house I originally hated. I am in less of a hurry to demolish it and rebuild another one, and I am grateful for blessings everyday!
Subscribe to:
Posts (Atom)